Waaypoint

User guide

How to plan, track and ship work in Waaypoint, from your first team to AI agents, with pictures of each part.

Part 1

Getting started

Set up your workspace, find your way around, and invite your team.

Your workspace and Home

A workspace holds everything your company plans in Waaypoint: teams, work items, roadmaps and settings. Home shows a getting-started checklist, what's assigned to you, and what's happening across your teams.
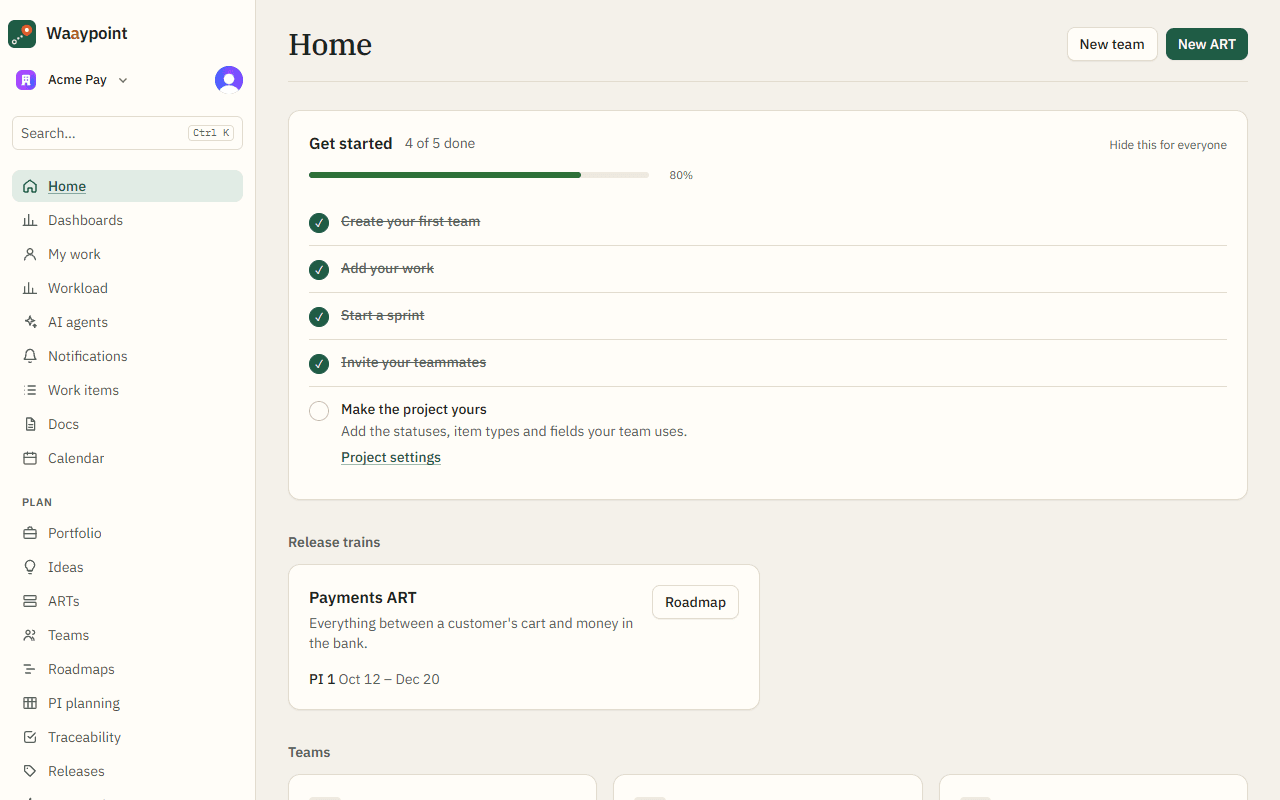
The Home page with the getting-started checklist
Home: the checklist walks new workspaces through setup.
  1. 1

    Sign in. Go to waaypoint.com, choose Sign in, and enter your work email. Waaypoint emails you a code; there's no password to remember.

  2. 2

    Create or pick a workspace. The first time, name your workspace (usually your company). If you belong to more than one, switch between them from the menu at the top of the sidebar.

  3. 3

    Follow the checklist. Home lists the first steps: make a team, add work, invite people and connect your tools. Each one ticks itself off when it's done. Hide the list once you're set up.

  4. 4

    Try the sample workspace. On an empty workspace, Load a sample workspace fills it with an Agile Release Train, teams, sprints and work items to explore. Delete them when you're ready.
Inviting people and roles

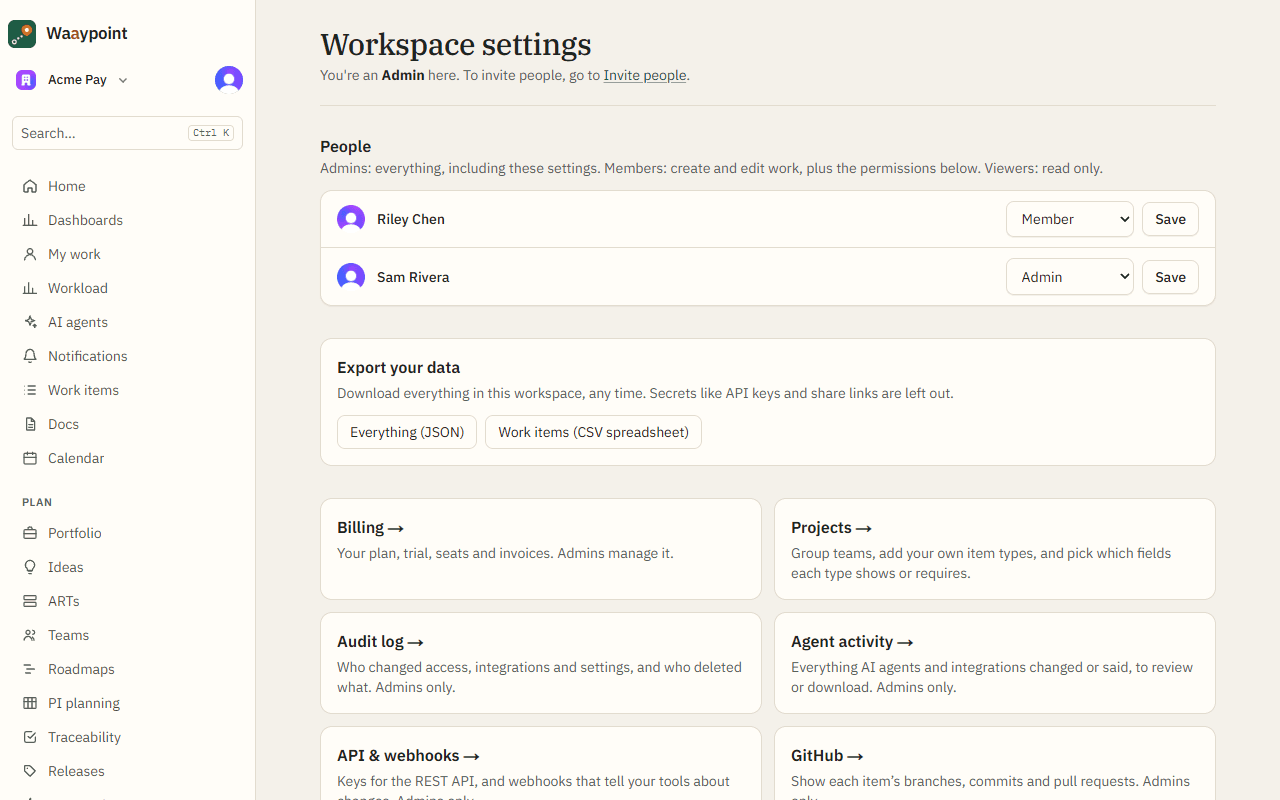
Everyone in the workspace is a member, an admin or a viewer. Admins manage settings, billing and integrations; viewers can look but not change anything.

Workspace settings with members and roles
Workspace settings: people, roles, permissions and security.
  1. 1

    Invite. Open Settings → Invite people and enter email addresses. Invitees get an email and join with their own code.

  2. 2

    Set roles. In Settings, change anyone's role. Choose what members may do (plan sprints, manage releases, import, share and more) with the permission checkboxes.

  3. 3

    Tighten security. Require two-factor sign-in for admins. Sensitive changes, like rotating secrets or changing roles, ask you to confirm it's you.

Good to know

  • Projects can be private: only the people you add to them see their teams and work.

Part 2

Planning the work

Work items, boards, backlogs and sprints: where most of the day happens.

Work items

Every piece of work is an item: an initiative, epic, story, task, bug or subtask. Each has a key like CHK-42 (its team's key and its number), a status, an assignee, points and dates.

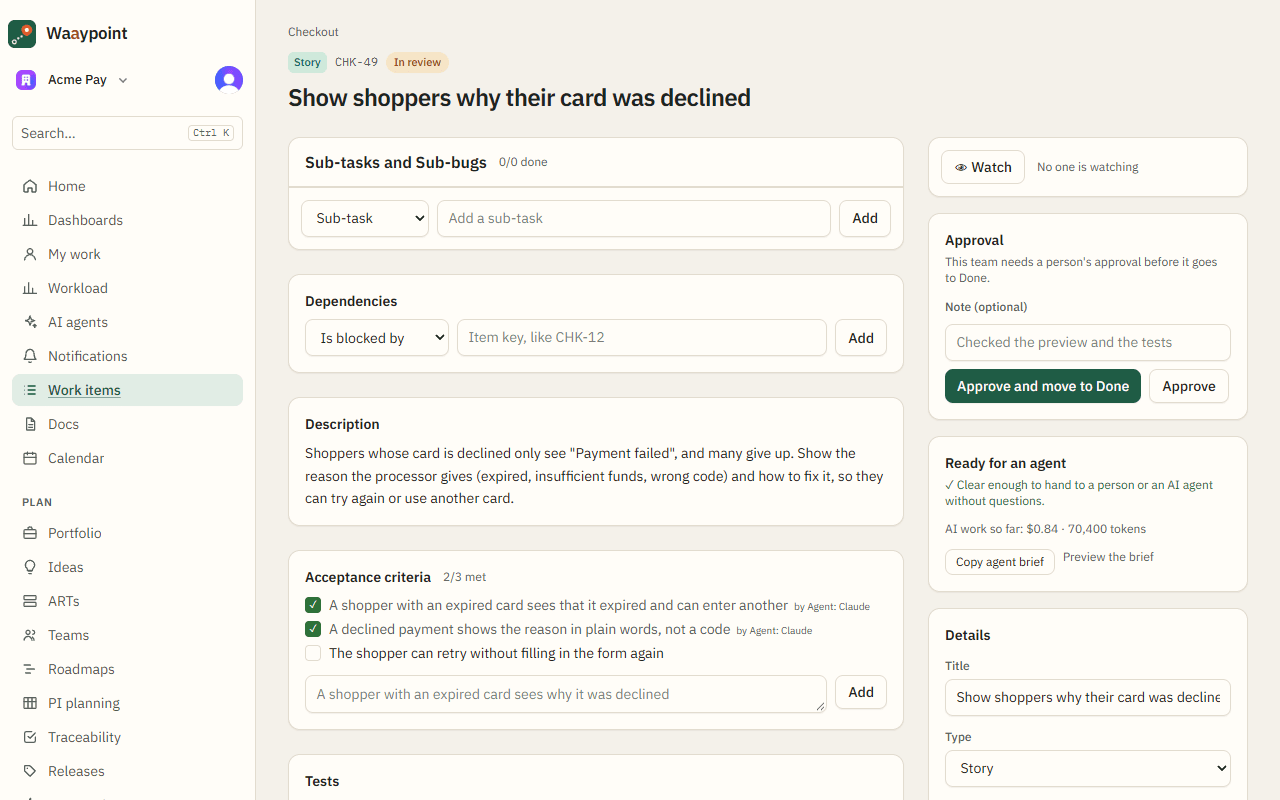
A work item page with its details, criteria and activity
An item's page: details on the right, description, criteria, docs and history on the left.
  1. 1

    Create an item. Press C, use + Add item on a board, or New work item on the Work items page. Give it a title; everything else can come later.

  2. 2

    Fill in the details. On the item's page, set its type, team, status, priority, points, assignee, sprint, fix version, labels and dates, then Save.

  3. 3

    Break it down. Epics hold stories, stories hold subtasks. Add children from the item's page, and link items that block each other under Dependencies.

  4. 4

    Talk about it. Comment at the bottom of the page. Type @ and a name to mention someone; they get a notification. Reply to comments to keep a thread together, and react with emoji.

Good to know

  • Watch an item to hear about every change. You watch items you create or are assigned automatically.
  • Attach files, add a checklist, and log time spent from the item's page.
  • Deleting an item moves it to the trash for 30 days; Undo appears right away.

Boards

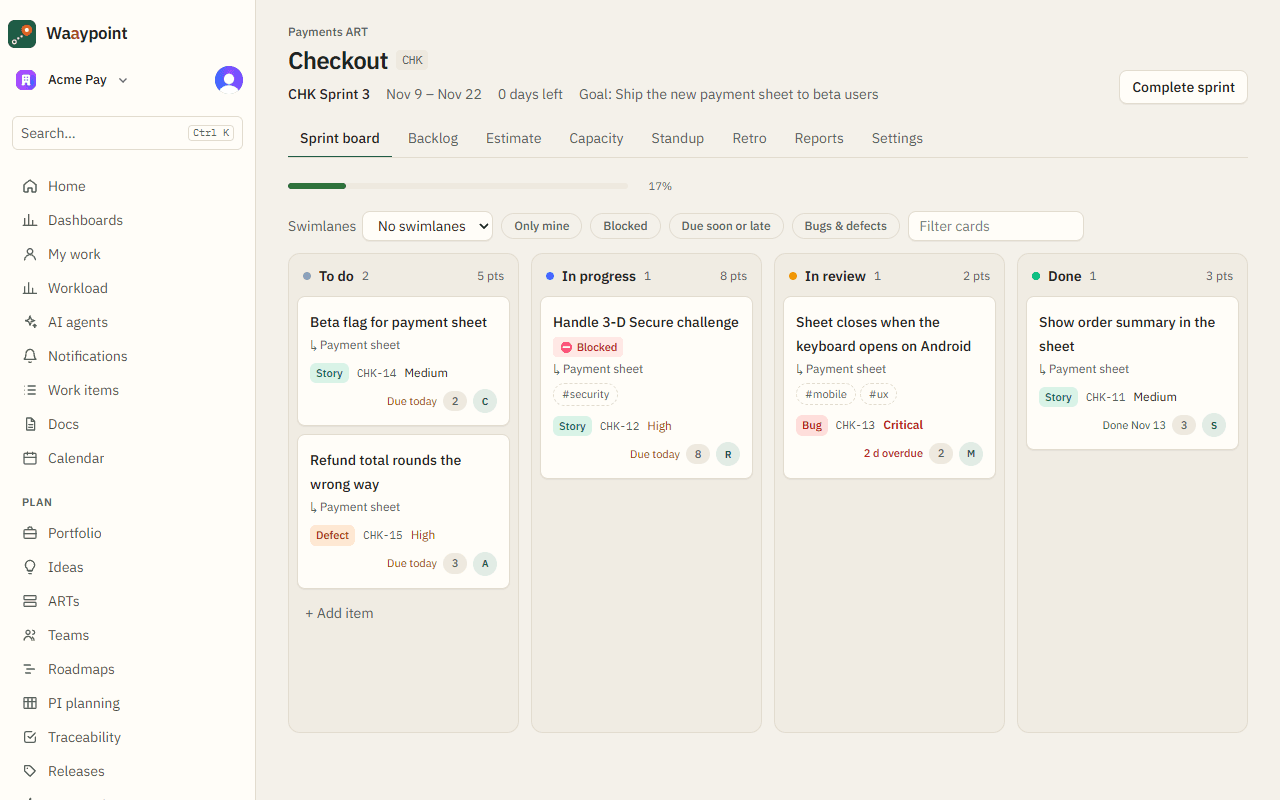
Each team has a board: a sprint board for scrum teams or a kanban board. Drag cards between columns to change their status.

A team's sprint board with columns and cards
A sprint board, with swimlanes and quick filters at the top.
  1. 1

    Move work. Drag a card to another column, or use the card's move menu from the keyboard. The item's status and history update.

  2. 2

    Focus the board. Use quick filters (only mine, blocked, due soon or late, bugs) and swimlanes by assignee, epic or priority.

  3. 3

    Shape the columns. In the team's settings, add, rename and order columns, map each to a status, and set work-in-progress limits.

Good to know

  • A card's square sparkle badge means it's assigned to an AI agent, not a person.

Backlog and sprints

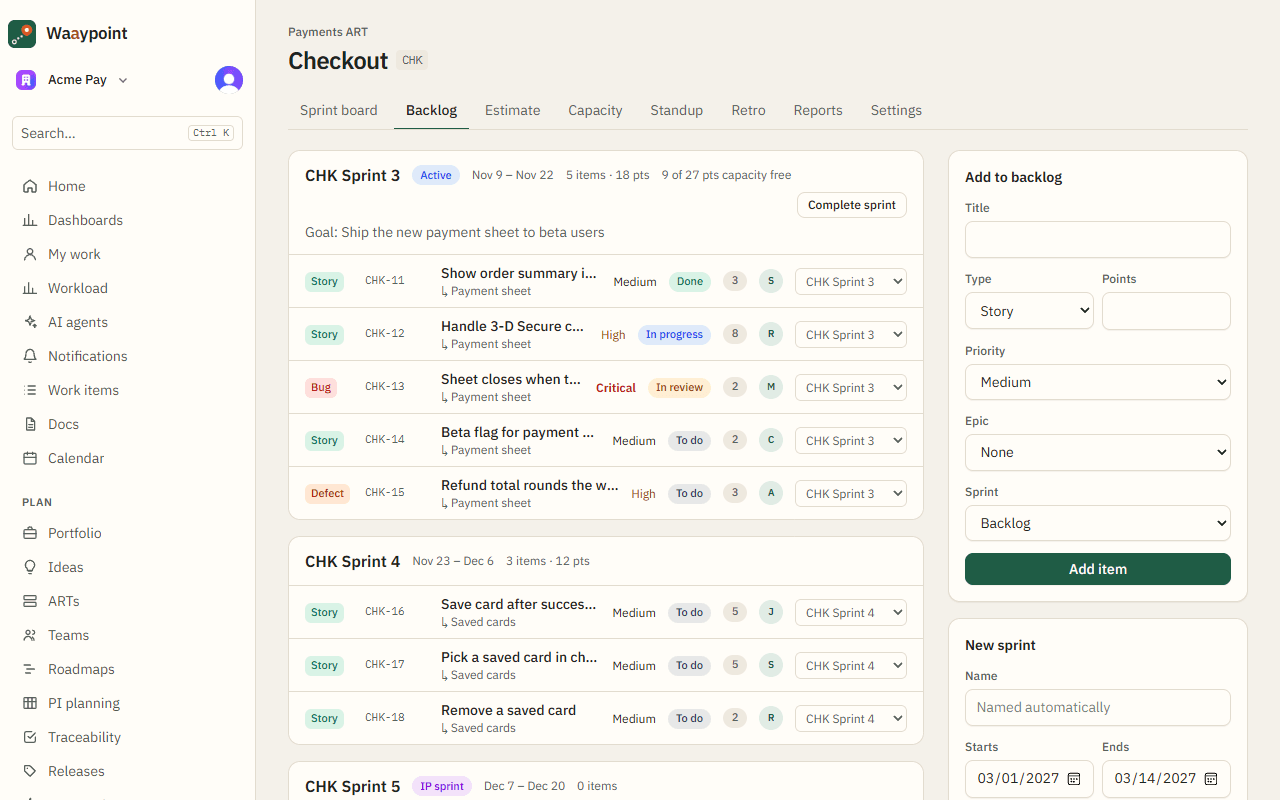
The backlog is everything a team hasn't finished, in priority order. Plan sprints by dragging work into them.

The backlog with sprints above it
Sprint planning: drag items from the backlog into a sprint.
  1. 1

    Prioritize. Drag items up and down the backlog. The top is what the team does next.

  2. 2

    Plan a sprint. Create a sprint with a goal and dates, drag items into it, and watch the points add up against the team's capacity.

  3. 3

    Start and finish. Start the sprint when planning's done. When it ends, complete it: unfinished work moves to the next sprint or back to the backlog.

Work items table, filters and WQL

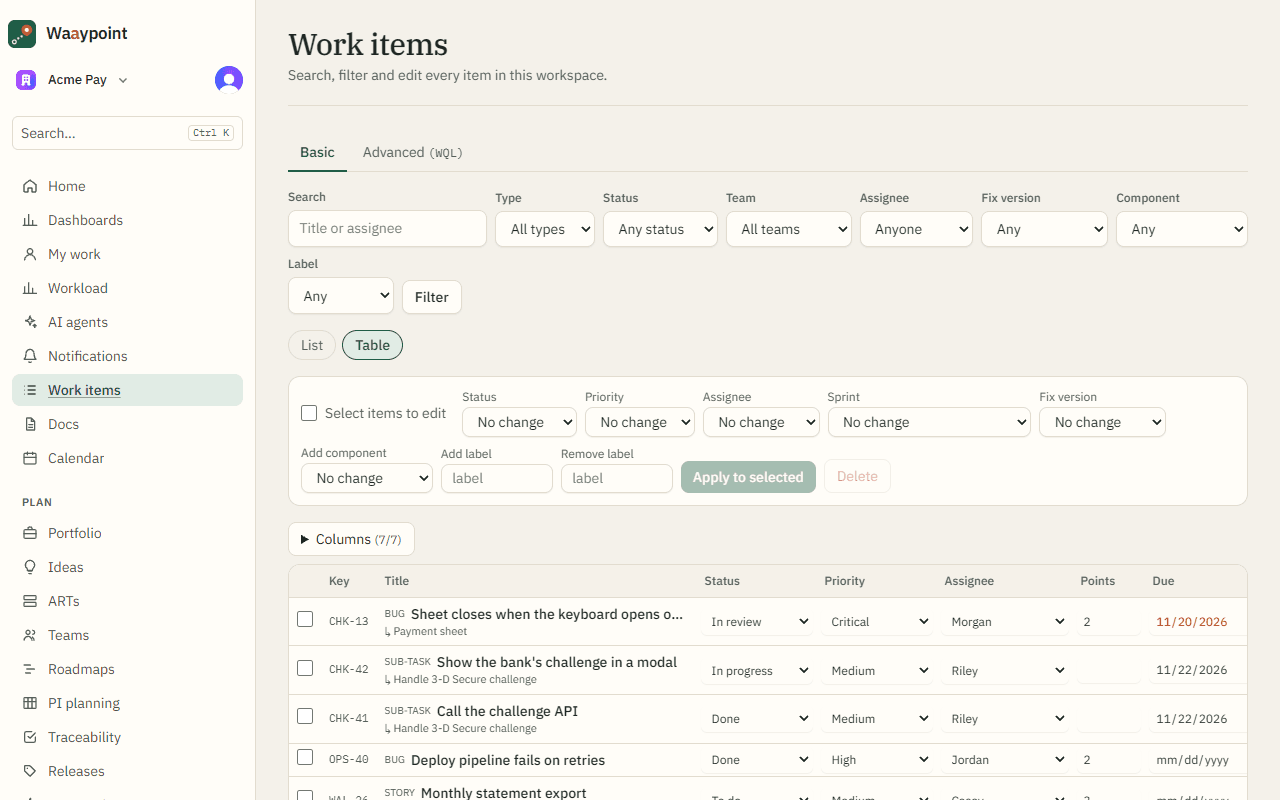
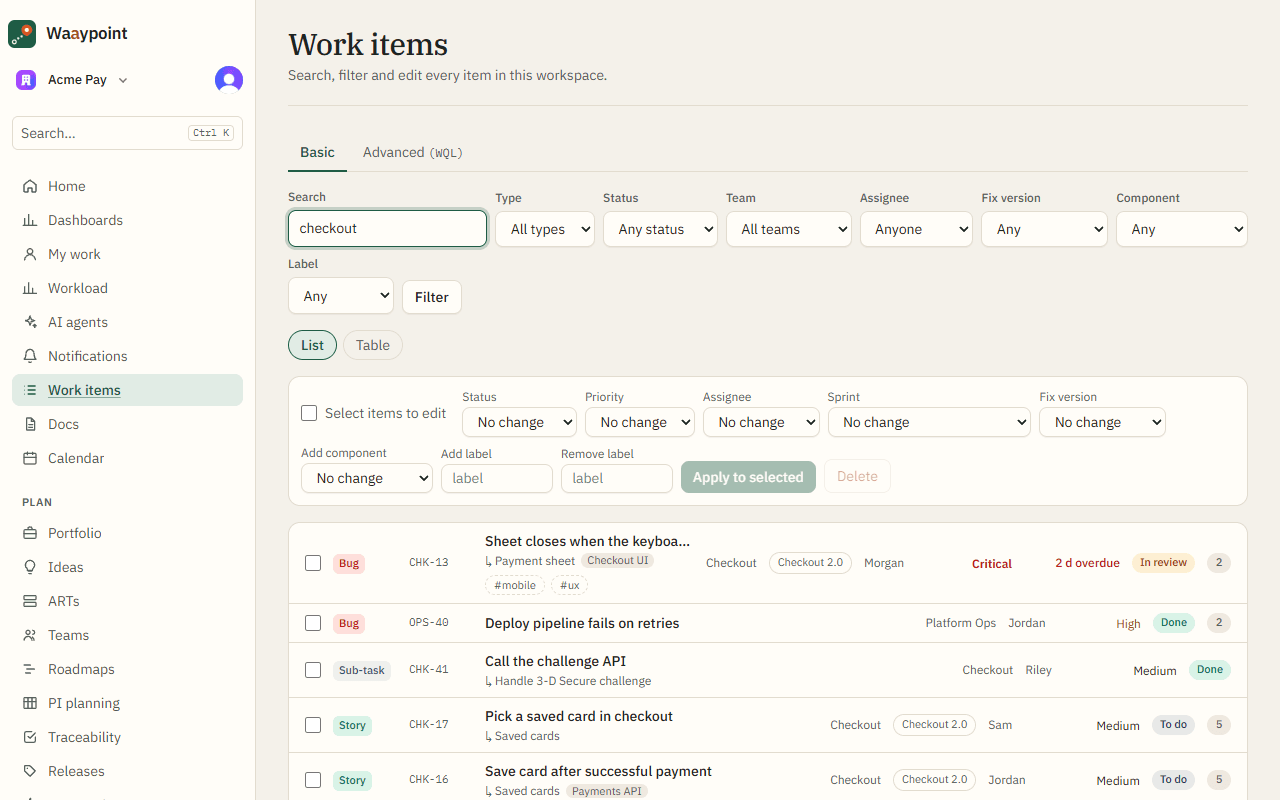
The Work items page lists everything you can see, as a list or a spreadsheet-like table you can edit in place.

The work items table with editable cells
The table view: change status, priority, points or assignee right in the row.
  1. 1

    Filter. Filter by team, type, status, assignee, label and more, or switch to a WQL query such as status = "todo" AND priority = high.

  2. 2

    Save a filter. Save any filter to come back to it, share it with the workspace, or use it on a dashboard.

  3. 3

    Change many at once. Tick items and use the bulk edit bar to set status, assignee, sprint, fix version or labels together.

Good to know

  • Choose which columns the table shows; your choice is remembered.

Estimating, capacity and standup

Estimate together with planning poker, check how much the team can take on, and run a standup written from what actually happened.

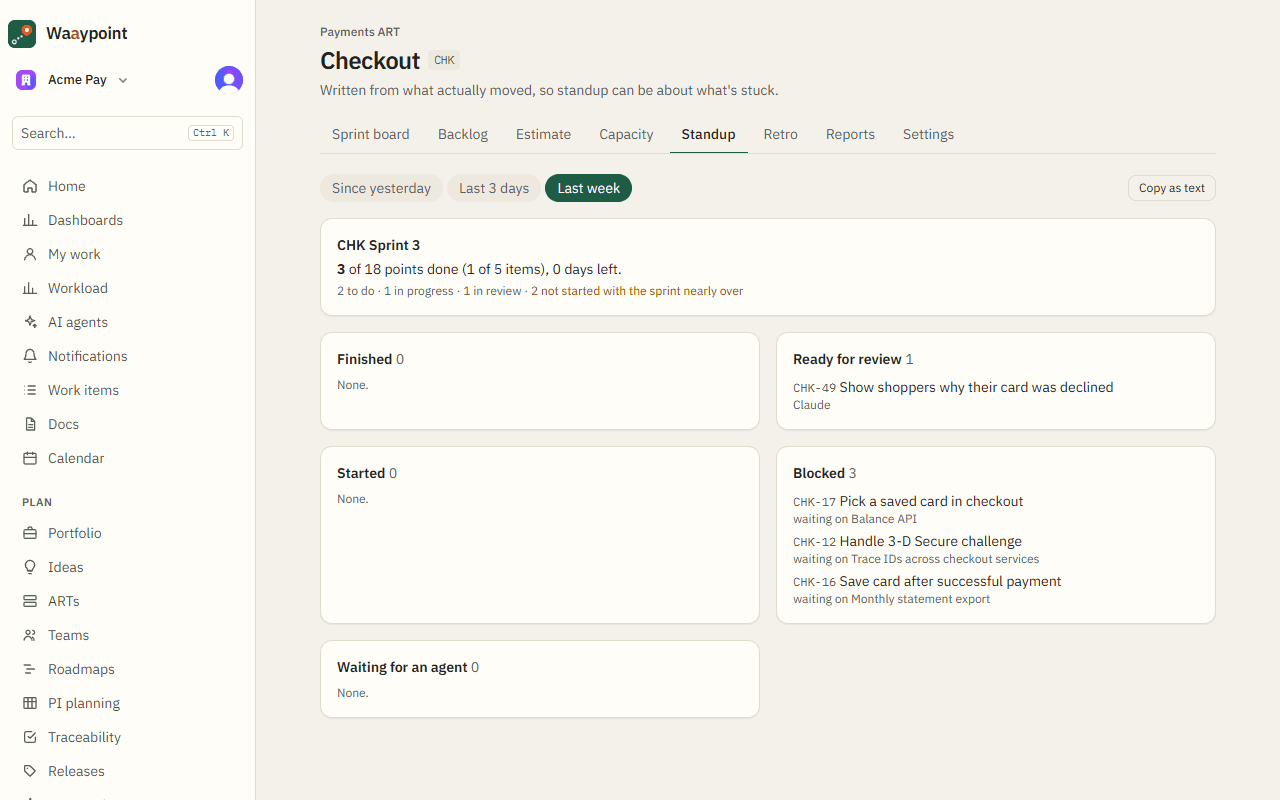
The team standup page
Standup: finished, ready for review, started, blocked, and the sprint at a glance.
  1. 1

    Planning poker. On the team's Estimate tab, pick items to estimate. Everyone votes privately, then the votes show together.

  2. 2

    Capacity. On the Capacity tab, set each person's points for the sprint and days off. AI agents are listed too, with their recent pace.

  3. 3

    Standup. The Standup tab lists what moved since yesterday (or the last 3 days or week), what's blocked and what's waiting for an agent. Copy it as text for chat.

Retrospectives

Look back on a sprint together: what went well, what to improve, and what you'll do about it.

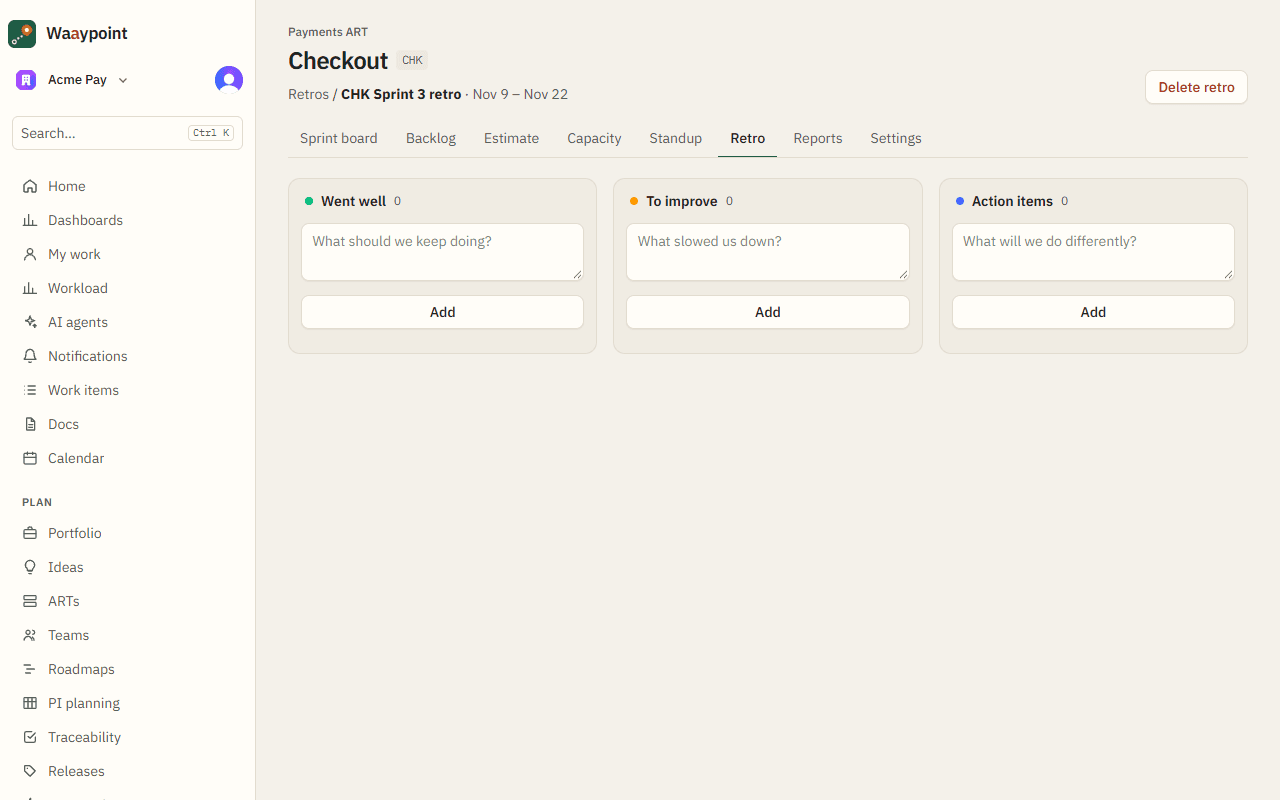
A sprint retrospective board
A retro: add notes, vote, and turn actions into work items.
  1. 1

    Start a retro. On the team's Retro tab, start one for the sprint that just ended.

  2. 2

    Add and vote. Everyone adds notes in each column and votes for what matters most.

  3. 3

    Act. Turn an action into a work item with one click, so it doesn't get lost.

Part 3

Roadmaps, portfolio and releases

From quarterly plans and Agile Release Trains to what ships when.

Roadmaps and Agile Release Trains

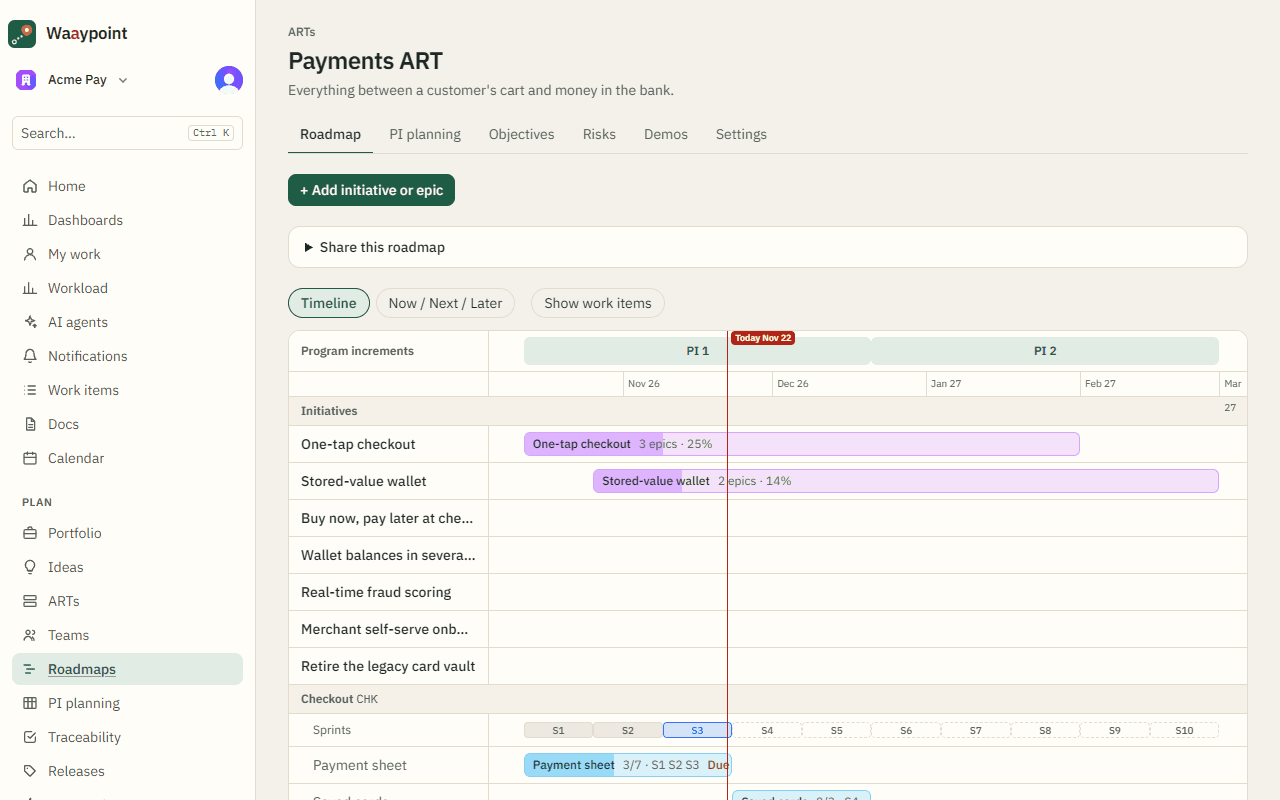
An ART (Agile Release Train) groups teams that plan together. Its roadmap shows initiatives and epics on a timeline, connected to the teams' sprints.

An ART roadmap timeline
The roadmap timeline; switch to Now / Next / Later for a simpler view.
  1. 1

    Create an ART. Under ARTs, create one and add teams to it.

  2. 2

    Plan on the timeline. Give initiatives and epics start and due dates; they appear on the roadmap with their progress.

  3. 3

    Share it. Create a read-only share link for people outside the workspace. Revoke it any time.

Good to know

  • Forecasts on epics and releases estimate when they'll finish from the team's recent pace.

PI planning

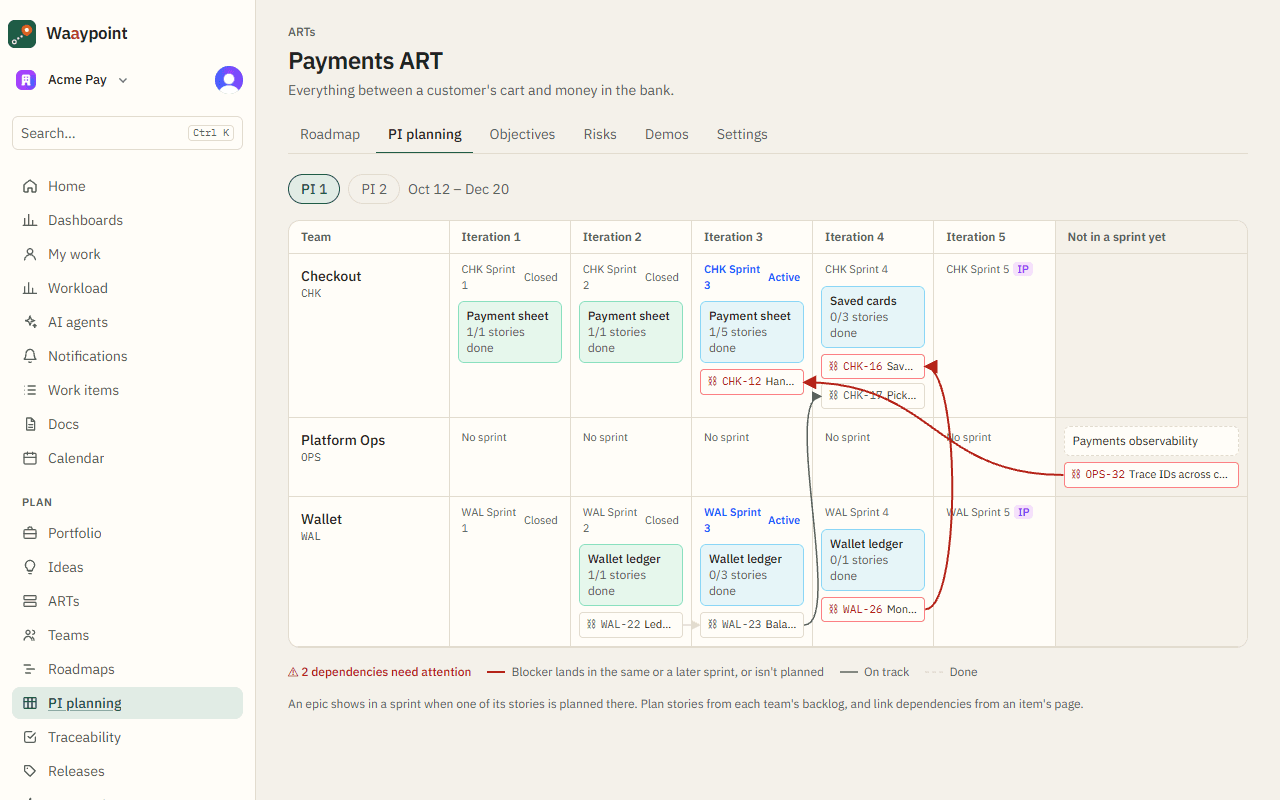
For SAFe teams: plan a Program Increment on one board, with objectives, risks, dependencies and a confidence vote.

The PI planning board
The PI planning board: features by team and sprint.
  1. 1

    Lay out the PI. Drag features into team rows and sprint columns. Dependencies between them show as links.

  2. 2

    Set objectives and ROAM risks. Each team writes its PI objectives; business owners give them value. Record risks and mark them Resolved, Owned, Accepted or Mitigated.

  3. 3

    Vote. Finish with a fist-of-five confidence vote.

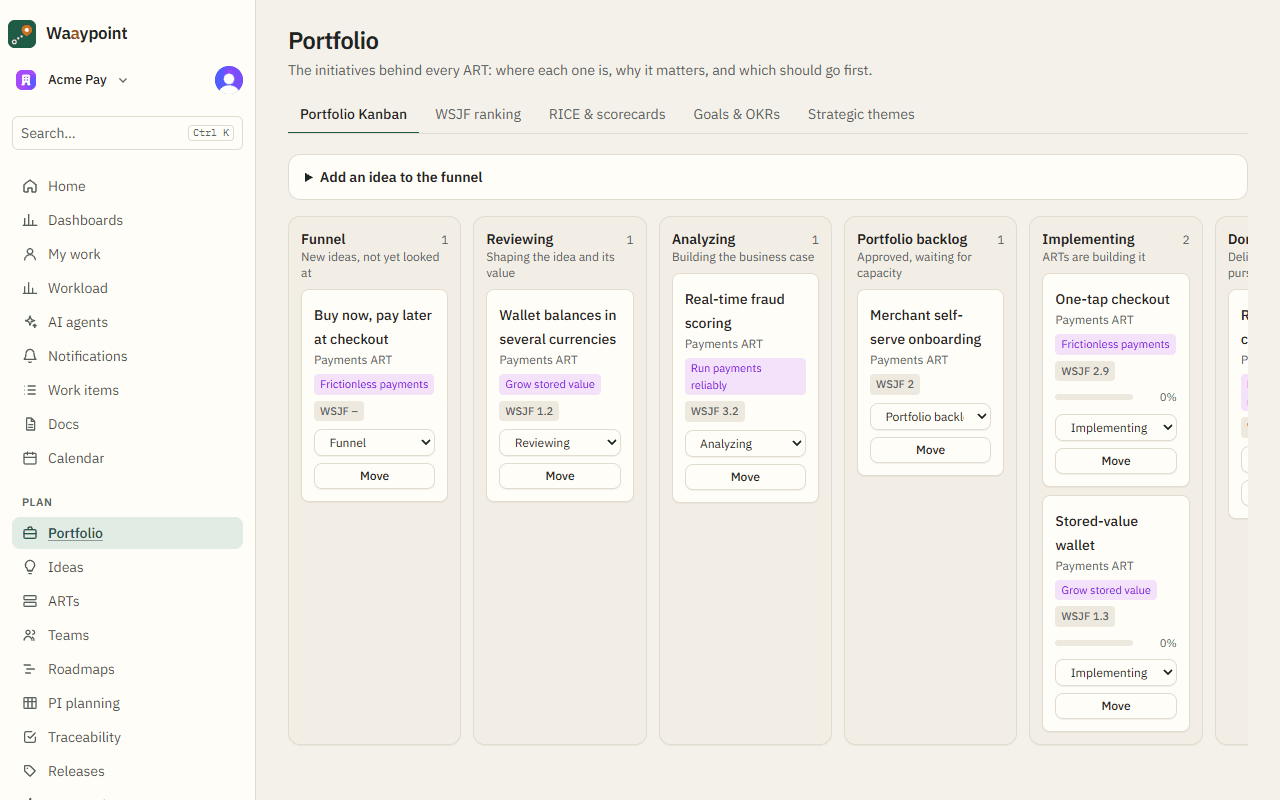
Portfolio, goals and prioritization

Track initiatives on a Lean Portfolio Kanban, tie them to goals and strategic themes, and rank them by WSJF or RICE.

The portfolio kanban
The portfolio: initiatives from funnel to done.
  1. 1

    Move initiatives. Drag initiatives through Funnel, Reviewing, Analyzing, Backlog, Implementing and Done.

  2. 2

    Set goals. Under Goals, write objectives with measurable key results and link the initiatives that serve them.

  3. 3

    Rank. Score initiatives and epics with WSJF or RICE to see what to do first.

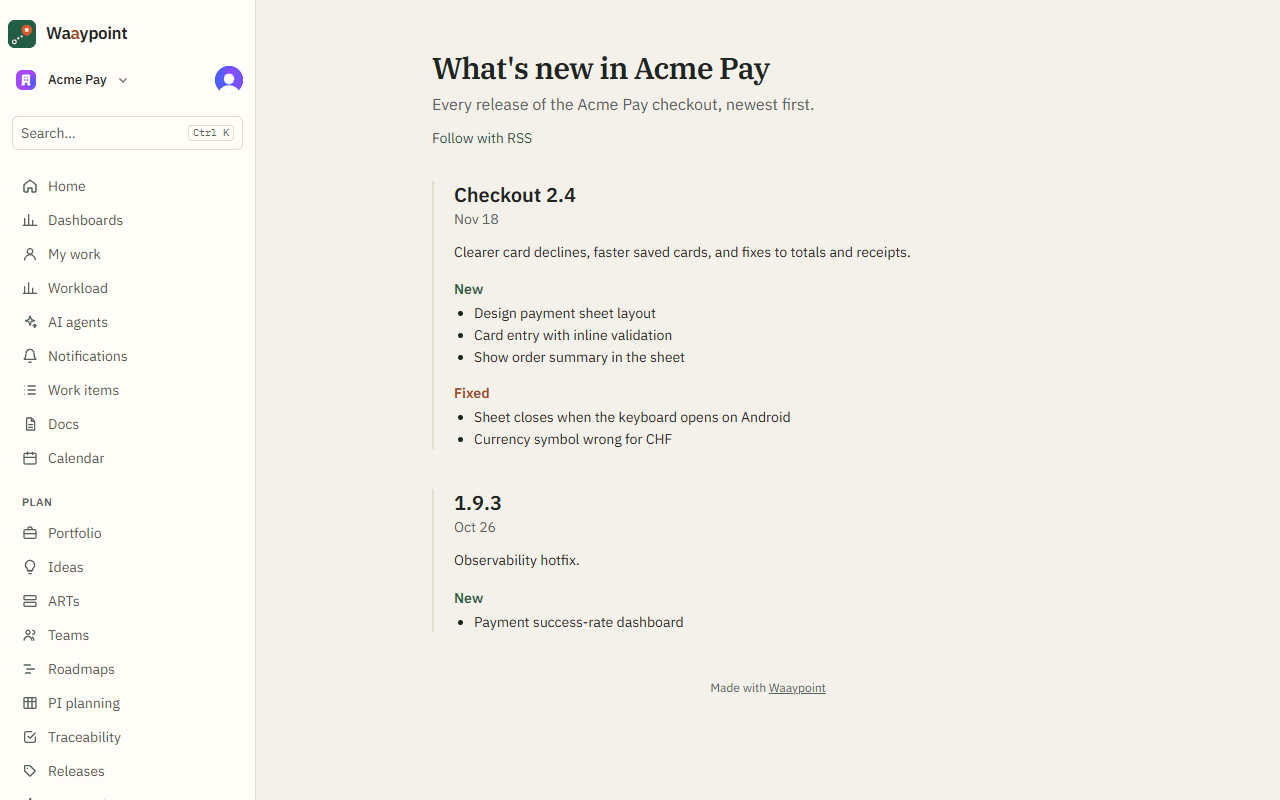
Releases and the public changelog

A fix version (release) is what ships together. Set an item's fix version, track progress, and publish what shipped.

The public changelog page
The public changelog: released versions with what's new and what's fixed.
  1. 1

    Create a release. On Releases, create a fix version with dates, then pick it as the fix version on work items.

  2. 2

    Use a checklist. Add release steps (notes, sign-offs, go/no-go) with owners and due dates, or start from a template. A release can require every step done before it's marked released.

  3. 3

    Publish a changelog. On Releases, give the public changelog a title and choose Publish. Share the link; customers can follow it with RSS. Items labelled internal stay off it.

Test cases and traceability

Show what was tested, how it went, by whom and when: link test cases to stories and bugs, record each run, and see coverage on one page.

  1. 1

    Add test cases. On a story, task or bug, open Tests → Add a test case with its steps and expected result. Link a case that covers several items by its number, like T-12.

  2. 2

    Record results. After a run, pick Passed, Failed or Blocked, add a note and an https link to the evidence (a CI run or screenshot), and choose Record result. Results are kept, never edited, and show in the item's history.

  3. 3

    Check coverage. Traceability lists every story, task and bug with its criteria, tests and latest results, and how much is covered and passing. Filter by team or fix version, and download it as CSV for an audit.

Good to know

  • AI agents see an item's tests in their brief, and can record results with the record_test_result tool.

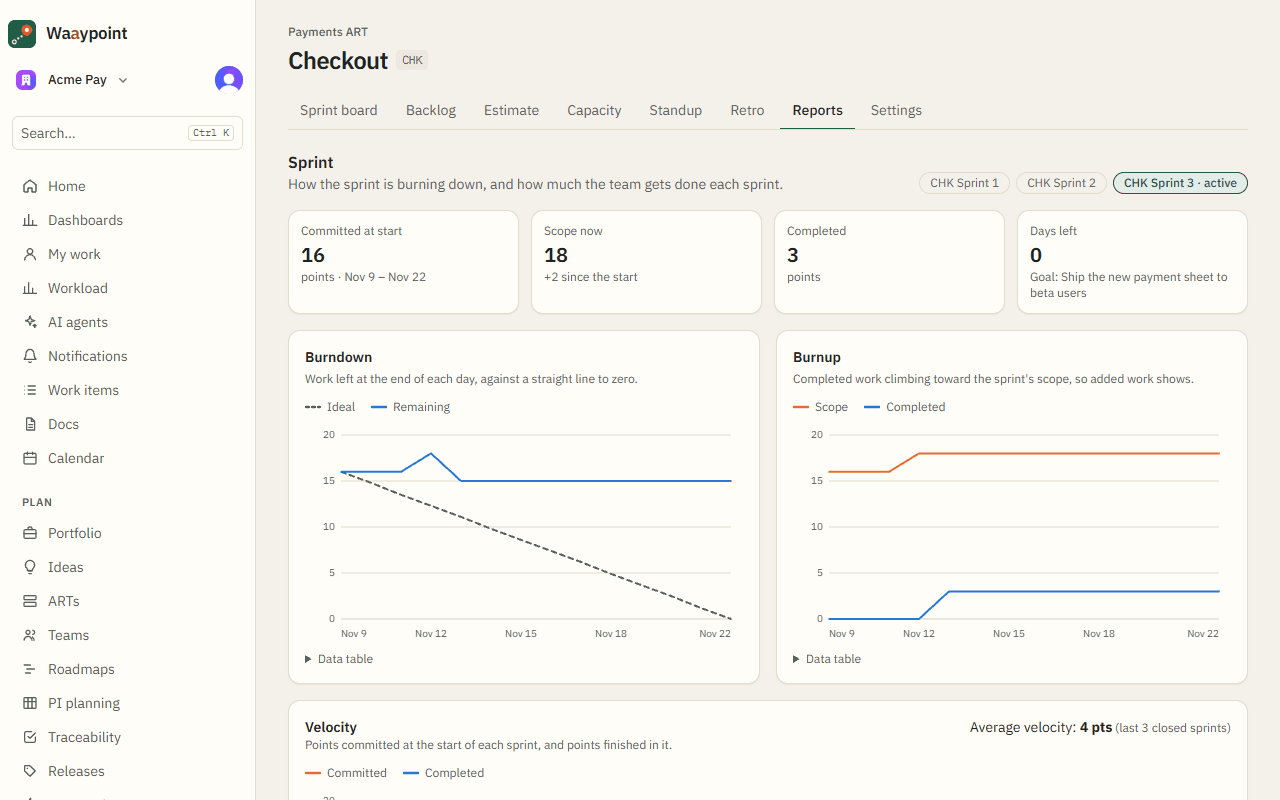
Dashboards and reports

Dashboards collect charts and lists you choose; each team also gets ready-made reports.

A team's reports with burndown and velocity
Team reports: burndown, velocity, cumulative flow and cycle time.
  1. 1

    Build a dashboard. Under Dashboards, create one and add widgets: a saved filter's results, charts, two-way tables, or created vs resolved.

  2. 2

    Read team reports. Each team's Reports tab shows sprint burndown, velocity, cumulative flow, cycle time and throughput.

  3. 3

    See workload. Workload shows how much each person has across teams, so no one's overloaded.

Part 4

AI agents

Let coding agents like Claude Code pick up work, with people in charge.

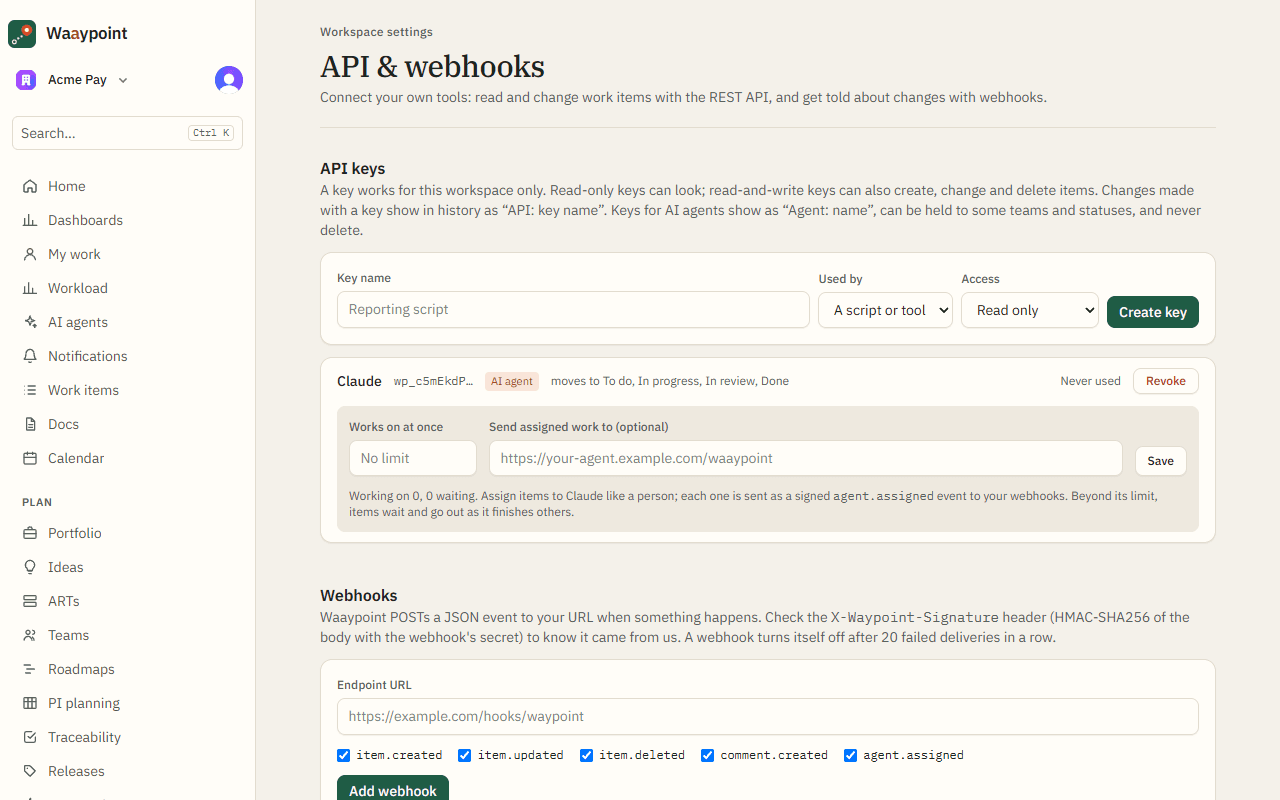
Connecting an AI agent

Waaypoint is an MCP server, so agents like Claude Code, Cursor and Codex can find, read, update and comment on work items with their own key.

Settings for API keys and AI agents
Settings → API & webhooks: make an agent key and copy the setup.
  1. 1

    Make an agent key. In Settings → API & webhooks, choose Used by: An AI agent. Pick the teams it may work in and the statuses it may move items to. Leave Done unticked so a person always finishes the work.

  2. 2

    Connect the agent. Copy the command shown (for Claude Code: claude mcp add …) or the JSON config for other tools, and paste in the key.

  3. 3

    Set a limit. Choose how many items the agent works on at once. Extra assigned items wait their turn.

Good to know

  • Agent keys can never delete anything, and their changes show as "Agent: name".
  • Apps that sign in with OAuth, like claude.ai connectors, only need the address https://waaypoint.com/api/mcp: you sign in, choose what it may do, and allow it. Disconnect it any time under Your connected apps in Workspace settings.

Giving work to agents

Assign an item to an agent like a person. It gets a brief with everything it needs and reports back as it works.

An item's acceptance criteria and agent readiness
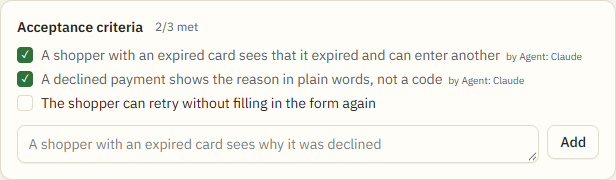
Acceptance criteria, and whether the item is ready for an agent.
  1. 1

    Make the item ready. Add acceptance criteria (outcomes anyone can check). Ready for an agent lists anything still missing, such as a description, estimate or team.

  2. 2

    Assign it. Pick the agent in the assignee menu. It's sent a signed event with the item and its brief; the activity says when.

  3. 3

    Watch it work. The agent moves the item, comments, checks off criteria and links its pull request. Copy agent brief gives the same brief to any tool by hand.

Good to know

  • With AI help turned on, Draft with AI writes acceptance criteria, and epics can be split into stories.

Approvals and who did what

Teams can require a person's approval before work counts as done, and every change shows whether a person, an agent or an integration made it.

The approval panel on a work item
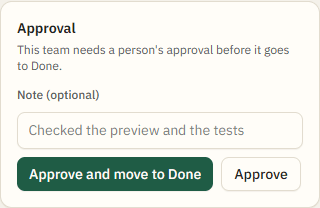
Approve, or approve and move to Done, with a note for the record.
  1. 1

    Turn on approvals. In a team's settings, tick Require a person's approval before Done. Items that reach Done without one go back to In review.

  2. 2

    Approve. On the item, add an optional note and choose Approve and move to Done. The assignee can't approve their own work, and agents never can.

  3. 3

    Review automated work. Filter an item's history to AI agents only, or see everything agents did in Settings → Agent activity, and download it as CSV.

AI metrics

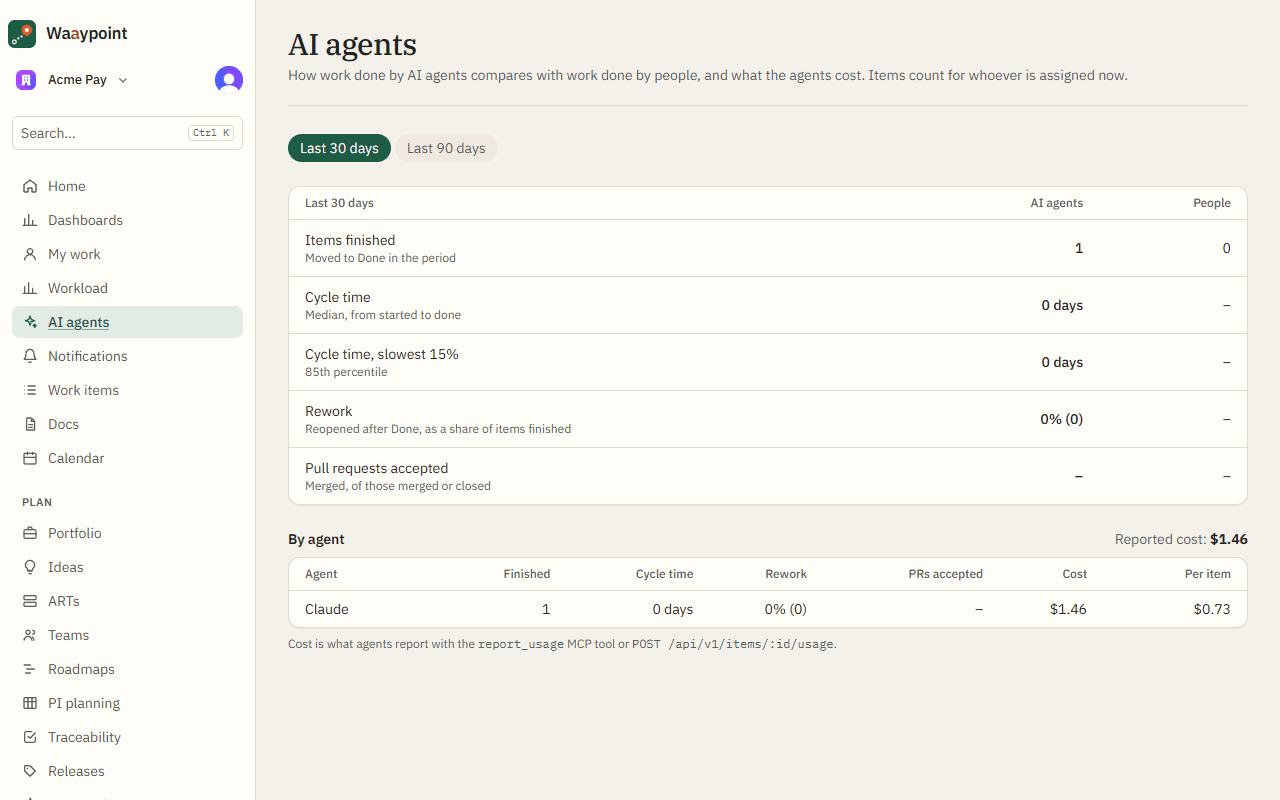
The AI agents page compares agents with people on speed, rework and pull requests merged, and shows what agents' work cost.

The AI agents metrics page
Agents vs people over the last 30 or 90 days, and each agent's cost.

Good to know

  • Agents report their cost per item; the item page shows the running total.

Part 5

Docs, import and integrations

Bring your work in and connect the tools you already use.

Docs

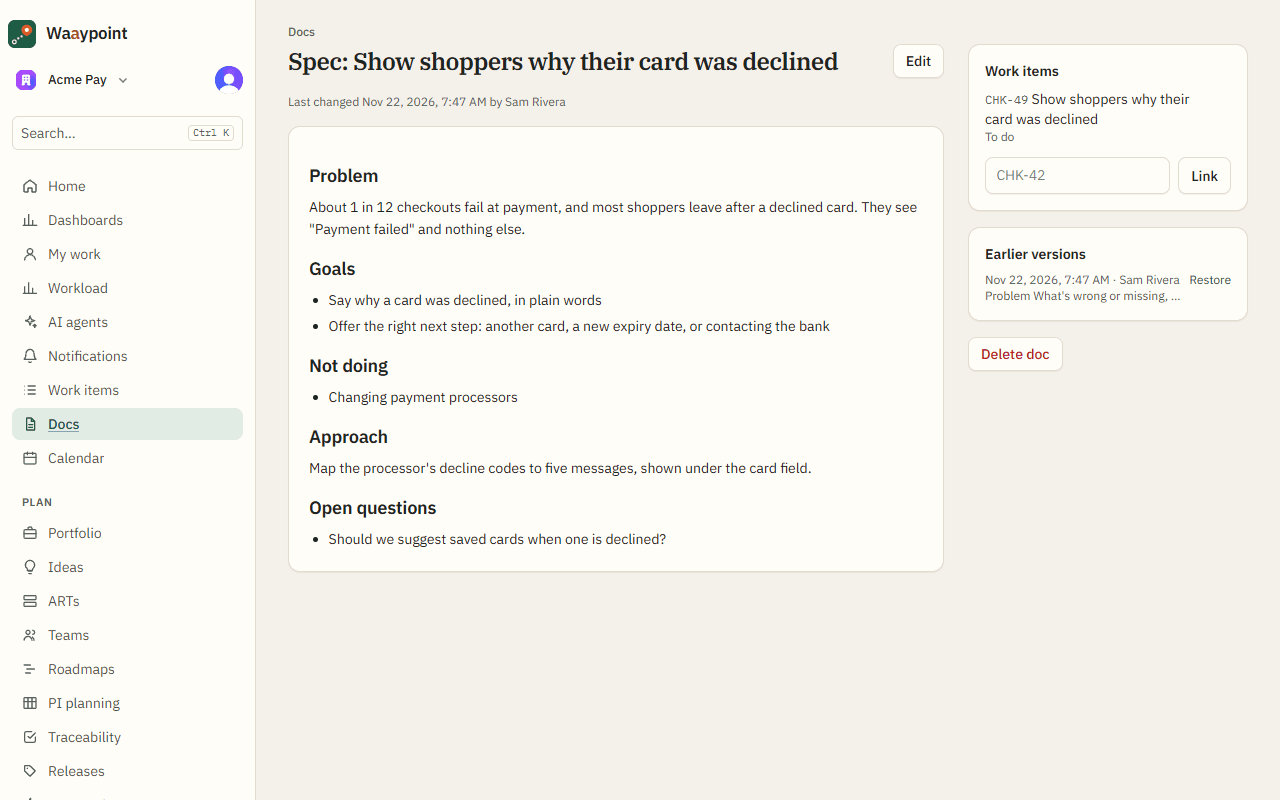
Write specs, design notes and decisions next to the work they're about. Linked docs show on their items and go into agent briefs.

A spec doc linked to work items
A doc with its linked work items and earlier versions.
  1. 1

    Write a doc. Under Docs, create one, or choose Write a spec on any work item to start with an outline.

  2. 2

    Link work. Link items by key from the doc, or pick a doc from the item's Docs card.

  3. 3

    Go back in time. Every save keeps the previous version. Restore any of them from Earlier versions.

Importing from Jira, Linear or Azure DevOps

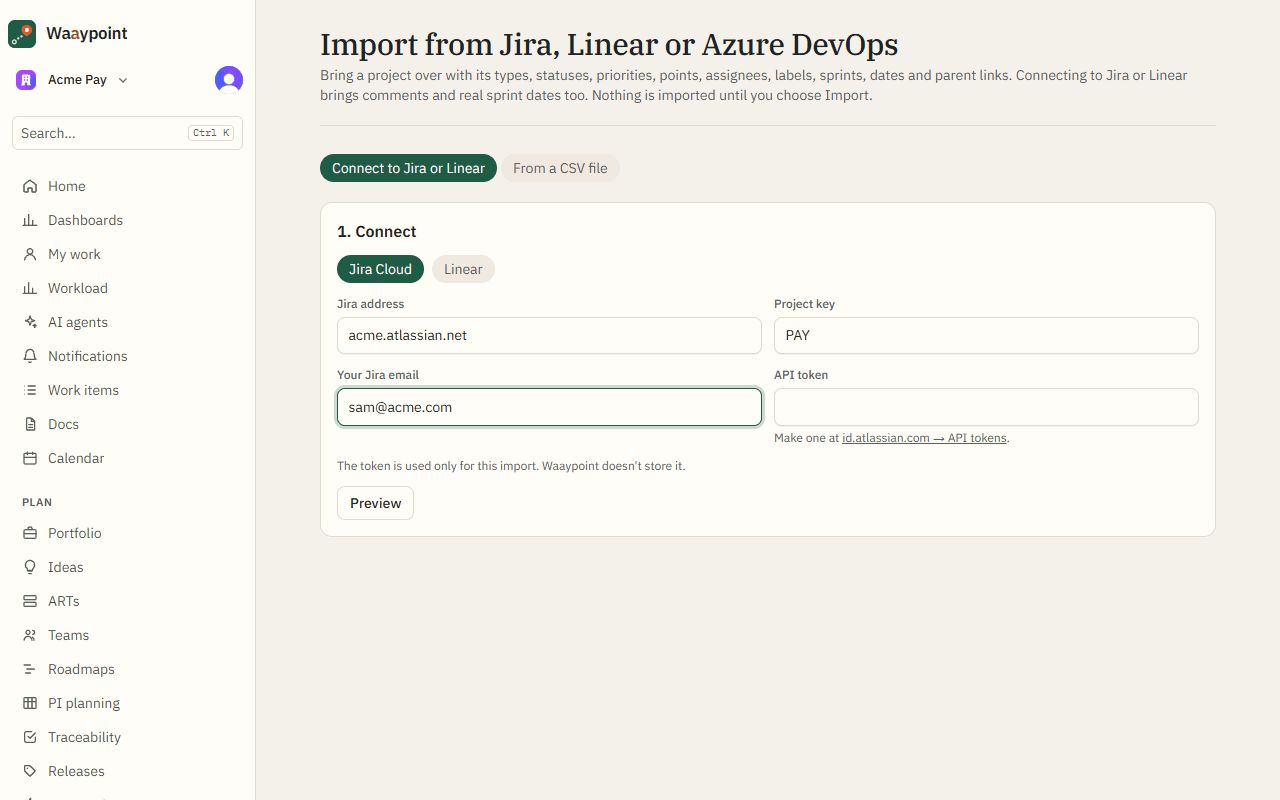
Bring a project over with its items, comments, sprints, assignees and parent links.

The import page connected to Jira
Connect to Jira or Linear with an API token, preview, then import.
  1. 1

    Connect. Choose Jira Cloud (your site, email, API token and project key) or Linear (a personal API key and team key). The token is used once and never stored.

  2. 2

    Preview. See how many items, comments and sprints will come over, with a sample.

  3. 3

    Import. Pick an existing team or make a new one, and import. Or use From a CSV file for Jira or Azure DevOps exports.

GitHub

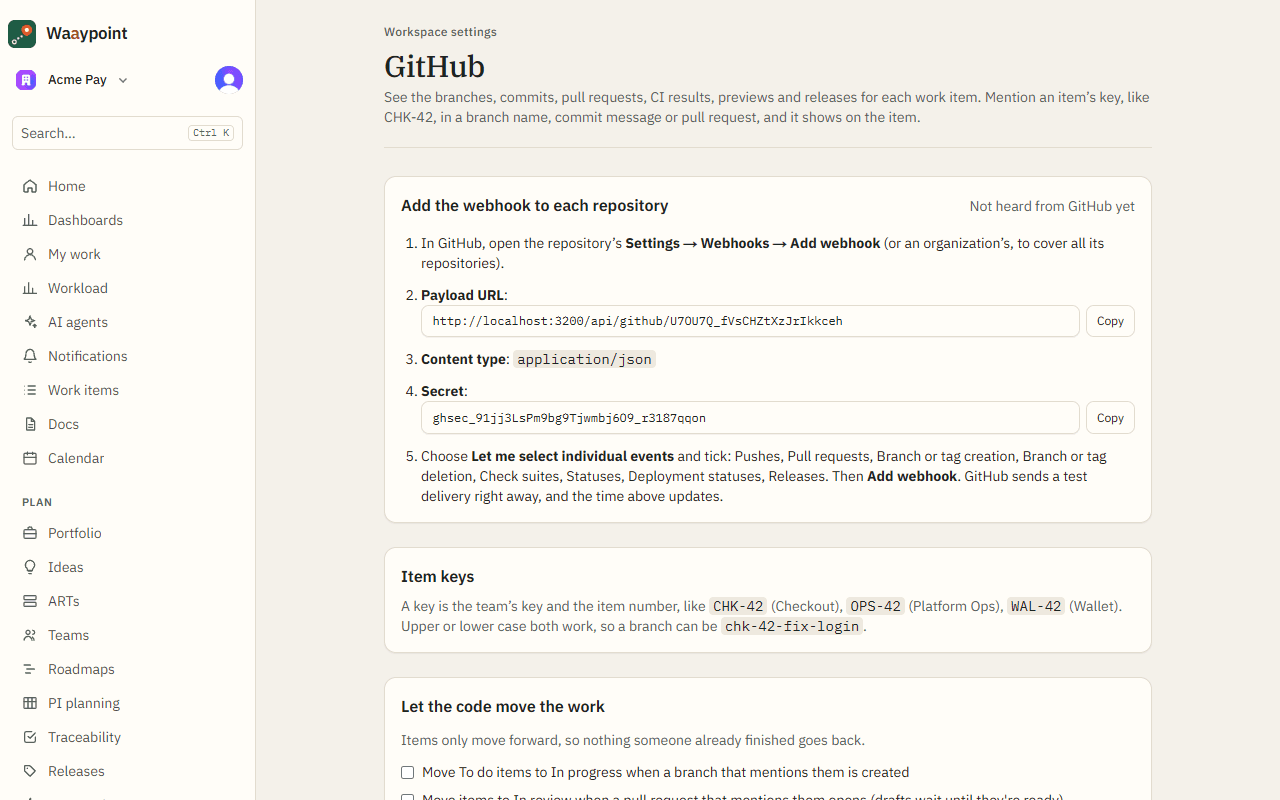
Branches, commits, pull requests, CI results, preview deployments and releases show on the items they mention, and can move items along.

GitHub settings
Settings → GitHub: add the webhook, then choose what code changes do.
  1. 1

    Add the webhook. Copy the payload URL and secret into your repository's (or organization's) webhook settings and tick the events listed.

  2. 2

    Mention items. Put an item's key in a branch name, commit message or pull request title, like chk-42-fix-login.

  3. 3

    Let code move the work. Optionally move items to In progress on a new branch, In review when a pull request opens, Done on merge, and set fix versions from release tags.

Slack

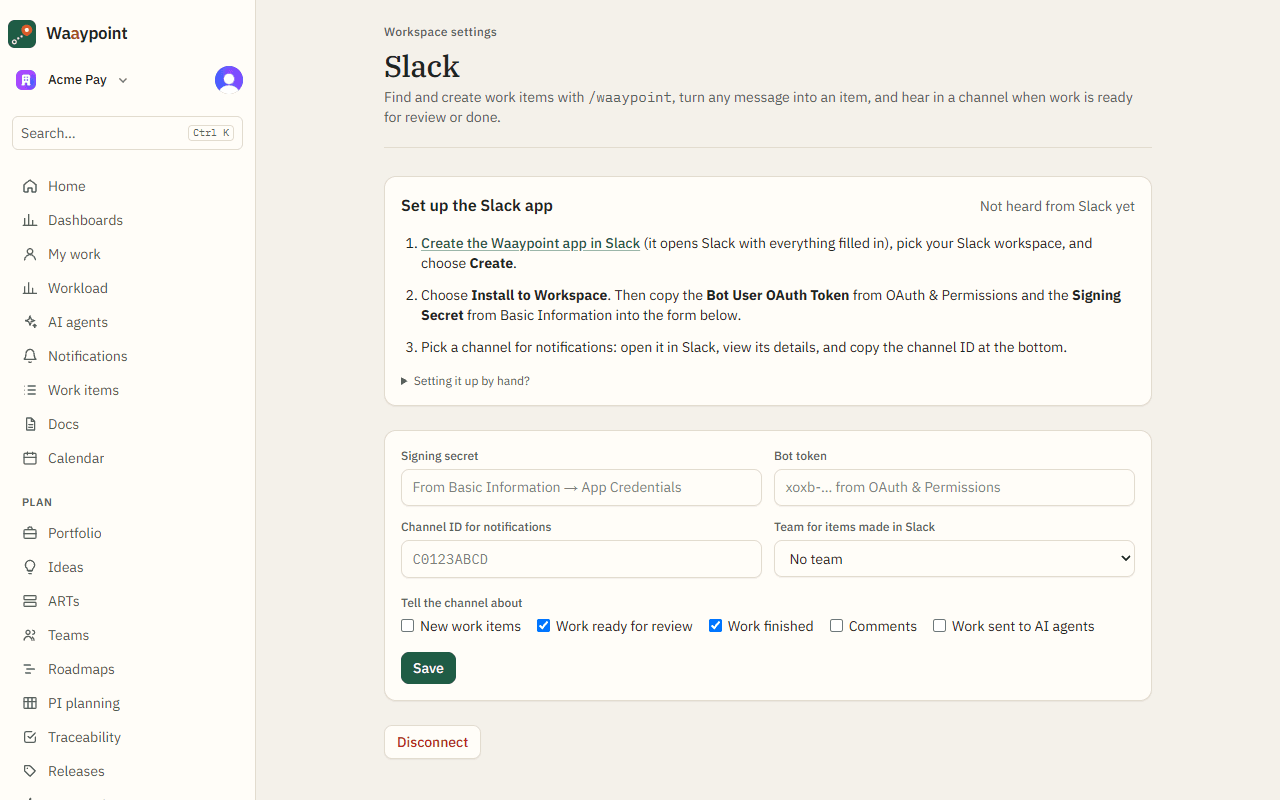
Find and create work with /waaypoint, turn any message into an item, and hear in a channel when work is ready for review or done.

Slack settings
Settings → Slack: create the app in one click, then paste back two values.
  1. 1

    Create the app. Choose Create the Waaypoint app in Slack, pick your Slack workspace and install it.

  2. 2

    Paste back. Copy the bot token and signing secret into Waaypoint, choose a channel and the notifications you want.

  3. 3

    Use it. Type /waaypoint new Fix the login to create an item, or /waaypoint login to find one. On any message, More actions → Create a Waaypoint item.

API and webhooks

Connect your own tools with the REST API (described at /api/v1/openapi.json) and webhooks that tell them when things change.

  1. 1

    Make a key. In Settings → API & webhooks, make a read-only or read-and-write key and send it as a bearer token.

  2. 2

    Add a webhook. Add your endpoint and the events it wants. Check each delivery's signature; recent deliveries show on the page.

Part 6

Automation and everyday tools

Let Waaypoint do the repetitive parts, and stay on top of your own work.

Automation rules, recurring items and templates

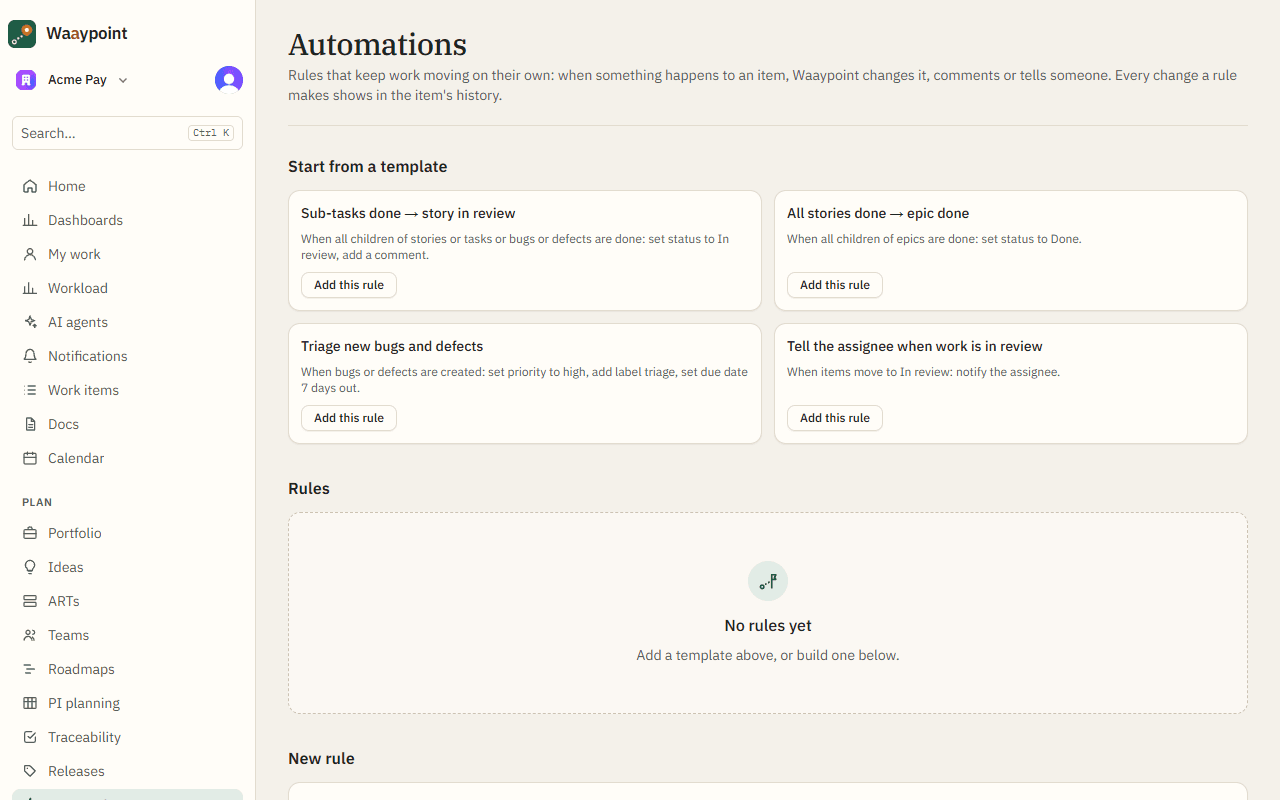
Rules act when items change; recurring items create work on a schedule; templates start items with the right fields and checklist.

Automation rules
Automation rules: when something happens, do something.
  1. 1

    Make a rule. Under Automations, choose a trigger (an item is created, changes status, is assigned, or all its children are done) and conditions, then actions: set fields, assign, comment or notify.

  2. 2

    Repeat work. Under Recurring, set up items that are created every day, week or month.

  3. 3

    Use templates. Save item templates and checklist templates in Settings, and start from them when creating work.

My work, notifications and calendar

Everything assigned to you, everything you need to know, and what's due when.

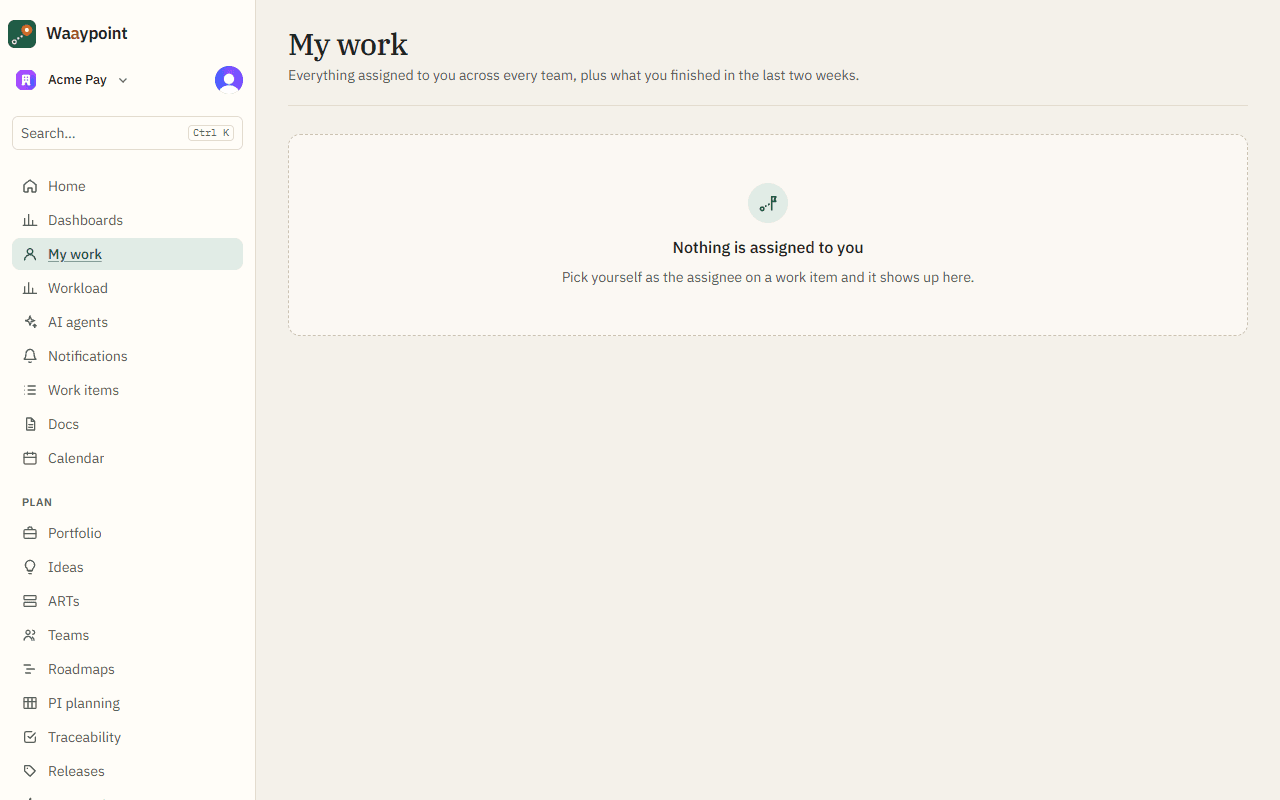
My work page
My work: your items across every team, grouped by status.
  1. 1

    My work. See your open items in every team, your release checklist steps, and what's due soon.

  2. 2

    Notifications. Mentions, assignments, comments and changes to items you watch. Get them by email too, and turn email off any time.

  3. 3

    Calendar and timesheet. See due dates, sprints and releases on a calendar, and the time you've logged on the timesheet.

Ideas and the public portal

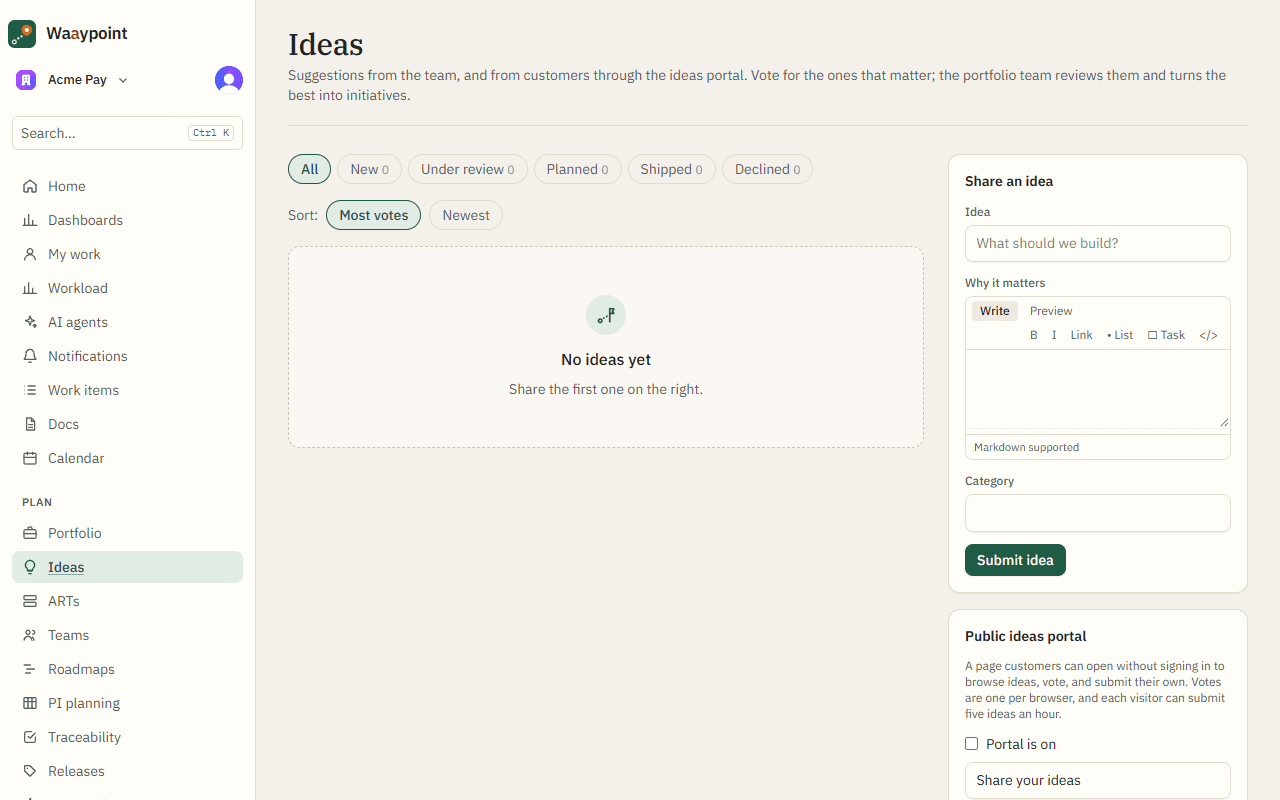
Collect ideas from your team and, if you like, from customers through a public portal where they can vote.

The ideas list
Ideas, with votes and statuses; promote the good ones to work items.

Part 7

Settings and billing

For admins: shape the workspace to how you work, and manage the plan.

Projects, fields and workflows

Projects group teams and hold their settings: which item types exist, custom fields, which fields each type shows, and custom workflows.

  1. 1

    Item types and fields. In Settings → Projects, switch built-in types on or off, add your own, and choose which fields each type shows or requires. Add custom fields in Settings → Fields.

  2. 2

    Custom workflow. Add your own states (like Ready for QA) and limit which moves are allowed.

  3. 3

    Project roles. Give people roles within a project, and make a project private.

Billing

Waaypoint is $8 per person a month after a 14-day free trial, with AI agents at $4 a month each. Yearly plans give two months free.

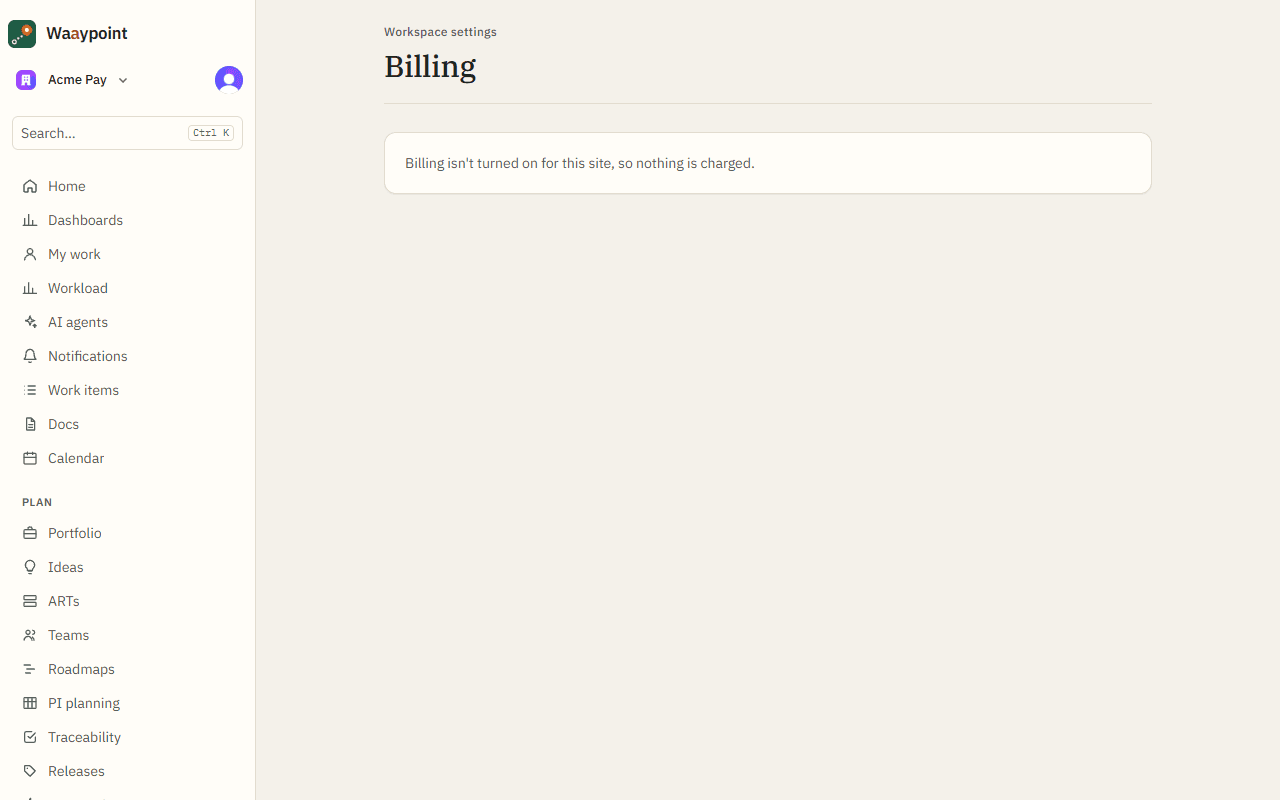
The billing page
Settings → Billing: your plan, what it costs, and invoices.
  1. 1

    Subscribe. In Settings → Billing, subscribe monthly or yearly. Any trial days left carry over.

  2. 2

    Manage. Change your card, download invoices or cancel from Manage billing. Admins get a receipt by email for each payment.

Good to know

  • If a trial or subscription ends, the workspace turns read only. Nothing is deleted.

Audit log, export and trash

See who changed what, take your data with you, and get deleted work back.

  1. 1

    Audit log. Settings → Audit log lists changes to access, integrations and settings, and deletions, for a year.

  2. 2

    Export. Download everything as JSON, or work items as a spreadsheet.

  3. 3

    Trash. Deleted items stay in the trash for 30 days, with their comments and links, ready to restore.

Questions? Ask your workspace admin, who can change settings and invite people.